Welcome to techytweaks..

Welcome to techytweaks. Hope you enjoy.

TechZone on techytweaks.

Get updated with the Latest Tech-Tweeks with techytweaks.

Need any Support/Help?

Need help? Got a thing for us?

Follow us!

Follow us on Social Networking sites...

Now follow techytweaks via Mobile!

Enjoy the mobile version of techytweaks now! Stay updated!

ADVT

Showing posts with label TRICKS. Show all posts

Use the Internet like a Pro!

Nothing new,You all must be using Internet for a long long time. But, ever wondered whether you are using the internet to its full potential, Well, there are a number of things which could change they way you will use internet. techytweaks will guide you how to enhance your internet usage. Check it out:-


Self desturcting files

Sending files over the internet is not a new thing, however did you you can send self destructive files over the internet? With firefox send, You can send a link to anyone containing the file. The link expired once the other person has downloaded the file or after 24hrs,Which ever comes first.


Find out whether you E-mail has been pwned!

Data breaches happen everyday, It may happen with anyone at anytime. This website quickly lets you know whether your E-mail has been breached or not. You must not take any risk and should secure you account right now If your account is found to be pwned!
https://haveibeenpwned.com/

Restore a tab
We’ve all closed a tab by accident. It’s annoying, especially if you’d gone down an Internet-sized rabbit hole and weren’t sure what site you were even on. In the past, you’d have to navigate to your browser’s history and reload it from there, though most browsers at least now offer a “Recently Closed Tabs” list.

Did you know there is an even faster way? Just press Ctrl + Shift + T and the tab will magically reappear. You can use the shortcut multiple times to open a succession of your closed tabs.


 Open Links in a New Tab

It can be annoying to click on a link and end up redirecting to that page and leaving the current page you were reading. Although, many sites open links in a new tab, for e.g we at TechReviewPro understand our readers need and hence we configure all links on the site to open in new tab. But many sites still don’t. To make sure you always open the link in a new tab, just press and hold Ctrl key and then click on the link. It will open the link in a new tab without any frustrations.

In Chrome, leave a bookmark name empty to only display the icon and take up less space.

Is your bookmark bar in Chrome getting a little too crowded? Right click a bookmark, select edit, delete the name field and leave it blank, save. This will leave what is known as the favicon which is usually the logo of the site. If you need more room on the bookmarks bar use folders to further organize.


Get rid of Windows 10 Updates forever

Windows Updates can be very annoying.
First, let us take a look why people may want to turn off Windows updates.
With Windows 8.1 and earlier versions, we had Windows Update giving us options to:
  1. Install updates automatically (Recommended)
  2. Download Updates but choose when to install them
  3. Check for updates but let me choose whether to download and install them
  4. Never check for updates (Not Recommended)
These options provided a way to defer updates until we had enough time to download and install them or to have them downloaded automatically and then install them at a time we wish. 


Microsoft has explained that it will provide updates in two distinct methods for its two distinct types of clients.
First are the home users who will not have the option to defer upgrades. The updates will download and install even if they are working on something, making the computer slow in some cases. The PC however would restart only if you are not doing anything or it would restart at the scheduled time, if you have etone. Where a reboot would be required, the user might have to save his or her work and then reboot before going back to the work he or she was doing. Of course, Windows 10 will let you defer restart, but that is not enough because a download in background might slow down your browsing in some cases.
The other ring of users are the enterprise users who will have the option to delay updates, so that they can hold it to the time when they are free. Microsoft said it will push updates to such users less frequently, so that they are faced with a minimum down time. These are the corporates and real-time users such as hospitals and ATMs etc.
Coming back to Home users and Professional users, there is not even the option to delay the updates. They will be downloaded as soon as they are available. Availability of Windows Updates for normal users means that the updates have already been tested by Windows Insiders. If you are a Windows Insider, running Windows 10 Home or Pro, you will be in first priority to receive updates. After few days of you testing the updates and if it doesn’t pose any problems, it will be released to the normal ring of users.
Thus, you are stuck. Windows 10 will keep on downloading updates as soon as they are available and will occupy your computer resources, when you may not want it too. Some of us will want to keep the automatic downloads to be stopped so that we can install the updates manually when free – when we are not working on something urgent. That is to say, some users would want the liberty and option to download and install updates when they want and not when Microsoft provides it.

We won't make you wait again,Now lets move on to the procedure for blocking windows update!
  • Goto :Control Panel > Administrative Tools, you can access Services
  • In the Services window, scroll down to Windows Update and turn off the process. To turn it off, right-click on the process, click on Properties and select Disabled. That will take care of Windows Updates not being installed on your machine.

Bonus: If you are already see 'Install Updates and Shutdown' on your shutdown menu, You can delete these downloaded updates by following the steps below:
  • Go to This PC and open the partition you have your Windows installed on (it’s usually C:)
  • Go to Windows folder
  • In Widows folder, ind folder named Softwaredistribution and open it
  • Open sub-folder Download and delete everything from it (you might need an administrator permission)

How to setup a custom domain using godaddy with blogger

It's always better to add a custom domain to your blog and boost up the visitors,traffic etc. The technology is growing day by day and hence it is better everyone to be updated.
First of all, Adding a domain to blog isn't a complex task.If you're a true blogger, and wish the world to know about you,Do it.
Here are some popular domain hosting sites:

  • godaddy
  • Yahoo!Smallbusiness
  • No-IP
  • 1and1


We will be covering how to use a godaddy domain with blogger now(hoping to cover all of the mentioned web hosting sites within days)

Step-1
Buy a domain on godaddy.Domain name are not free but they cost around 10-12$ per year.
Step-2
Go to blogger,Select settings,Then 'Basic'
Step-3
Under publishing,Select "Setup a third party URL for your blog' and under that,type the domain name you've already registered with godaddy.
Step-4
Now,you should see something similar to this.Keep the tab opened,Open godaddy in a new tab,Login.
Step-5
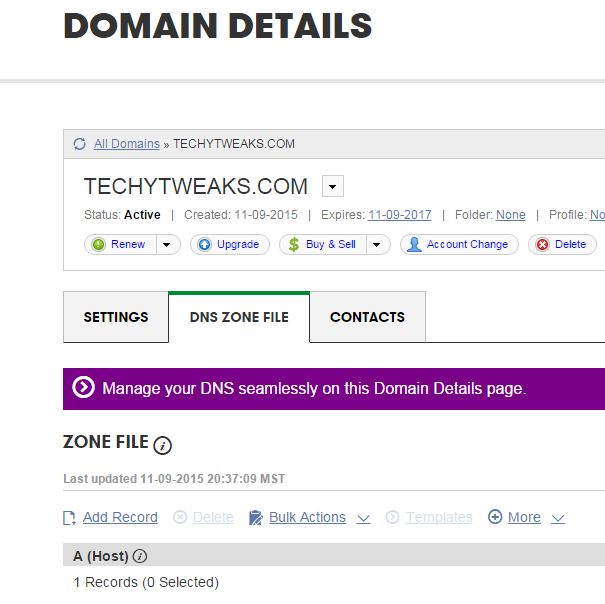
After logging in,Select Domains>All Domains>Manage DNS.

Now,Select 'Add record'
Select 'CNAME' under 'Record type'.
Keep 'TTL' the same.
Enter the Other details
Add your details under 'Host' and 'Points to' from the Blogger settings (You can get it from the blogger settings tab which iv'e asked you guys to keep open.)

If you guys are still confused,Hope this helps.
Now, after filling all necessary details,Click finish.

Step-6
Now we have to create 4 more records in a similar fashion. The details to fill up while creating the records are as below 
Sl #Record TypeHostPoints toTTL
1A@216.239.32.211 Hour
2A@216.239.34.211 Hour
3A@216.239.36.211 Hour
4A@216.239.38.211 Hour
Once done, you should see only 4 records under the A Host section and those should be: 


Step-6
Now,Return to the blogger tab, And click "save' and it should do it :)

Windows 8 product keys

Since our Windows 7 activation keys was useful for many users,Here's Windows 8 keys! and more to follow :)
What Make Window 8 Special?

The new start menu feature, elegant and advance user interface makes window 8 special and unique as compared to any other operating system. Most importantly window 8 is an evolution of all previous windows released so far by the Microsoft.

 Window 8 Product Keys:

As it is a latest and premium version of windows so in order to avail the full and premium features of windows 8 you need a product key so you may enable the full version of window 8 working for you. As it has become the most popular window operating system there are hundreds of thousands of free serial keys for windows available online but most of them are not working properly.
.

Windows 8.1 2015 new keys

4NJ8T-3MRPX-HPRB6-9GKWD-Y4FXB

New Keys 2015

Windows 8 Cracked Keys(Activation/Product Keys)

HB39N-V9K6F-P436V-KWBTC-Q3R9V
6PN82-R4BBH-XX8K2-DCK84-VMFDH
QGR4N-78PMD-KCRQ7-83BXT-YG667
BTNJ7-FFMBR-FF9BH-7QMJ9-H49T7
G9XNM-YYY38-8R9HM-YFPTX-T8XT7
CR8NG-63KCR-X2MPD-G7M7P-GQ4DH
NGMMV-FVDXB-QP6XF-9FTRT-P7F9V
7TWWK-WNB2W-VRVPV-XG6RV-MBFDH
HN42W-QF3D6-2KM6W-C79XK-JW8XV
RFQ3N-4Y4XR-JY9PV-883PR-BY2KV
VC972-N7YXW-G9WQY-VBDP4-GXT67
QDCTN-G878G-WBHHQ-GW7XP-XTJXV
NBCCB-JJJDX-PKBKJ-KQX8X-WTV3H
2747P-9WNWW-MD6JF-HRC36-HFPKV
2Y8NR-PPTC4-XYX8G-4KQGC-6JCKV
38N79-8B9GY-J4JYJ-D29V3-YBFDH
3FCND-JTWFM-24VQ8-QXTMB-TXT67
GX9N8-4H2FH-D987T-BQ9GK-XKT67
P8MCC-G7NDR-D27YY-Q83CC-8W8XV
KKPMN-469HY-H6V43-T8VX2-8W8XV
T3NJK-3P683-2T7BJ-2X27F-8B2KV

SOME MORE KEYS

TK8TP-9JN6P-7X7WW-RFFTV-B7QPF
DNJXJ-7XBW8-2378T-X22TX-BKG7J
MBFBV-W3DP2-2MVKN-PJCQD-KKTF7 
6RH4V-HNTWC-JQKG8-RFR3R-36498
4Y8N3-H7MMW-C76VJ-YD3XV-MBDKV
28VNV-HF42G-K2WM9-JXRJQ-2WBQW Windows 8.1 serial key : ultimate edition

NTTX3-RV7VB-T7X7F-WQYYY-9Y92F

Windows 8 OS key : Professional edition

XKY4K-2NRWR-8F6P2-448RF-CRYQH

Windows 8 product key : Release preview

TK8TP-9JN6P-7X7WW-RFFTV-B7QPF

Windows 8 product number : Consumer preview

DNJXJ-7XBW8-2378T-X22TX-BKG7J

Windows 8 OS key : Developer’s preview

6RH4V-HNTWC-JQKG8-RFR3R-36498

Windows 8 product key : Developer’s version

Y8N3-H7MMW-C76VJ-YD3XV-MBDKV

6RH4V-HNTWC-JQKG8-RFR3R-36498

4Y8N3-H7MMW-C76VJ-YD3XV-MBDKV

MBFBV-W3DP2-2MVKN-PJCQD-KKTF7

28VNV-HF42G-K2WM9-JXRJQ-2WBQW

NF32V-Q9P3W-7DR7Y-JGWRW-JFCK8


Windows 8 serial key : English

DNJXJ-7XBW8-2378T-X22TX-BKG7J

Windows 8 software key : Chinese

DNJXJ-7XBW8-2378T-X22TX-BKG7J

Windows 8 serial number : German

DNJXJ-7XBW8-2378T-X22TX-BKG7J

Windows 8 unique serial number : French

DNJXJ-7XBW8-2378T-X22TX-BKG7J

Windows 8 product key : Japanese

DNJXJ-7XBW8-2378T-X22TX-BKG7J

Window 8 Serial Keys 100 % Working

2GVN8-TV3C2-K3YM7-MMRVM-BBFDH

967N4-R7KXM-CJKJB-BHGCW-CPKT7

84NRV-6CJR6-DBDXH-FYTBF-4X49V

RRYGR-8JNBY-V2RJ9-TJP4P-749T7

ND8P2-BD2PB-DD8HM-2926R-CRYQH

XWCHQ-CDMYC-9WN2C-BWWTV-YY2KV

BDDNV-BQ27P-9P9JJ-BQJ96-KTJXV

KNTGM-BGJCJ-BPH3X-XX8V4-K4PKV

F8X33-CNV3F-RH7MY-C73YT-XP73H

967N4-R7KXM-CJKJB-BHGCW-CPKT7

HNRGD-JP8FC-6F6CY-2XHYY-RCWXV

84NRV-6CJR6-DBDXH-FYTBF-4X49V

BDDNV-BQ27P-9P9JJ-BQJ96-KTJXV

CDQND-9X68R-RRFYH-8G28W-82KT7

DWV49-3GN3Q-4XMT7-QR9FQ-KKT67

F2M4V-KFNB7-9VVTW-MVRBQ-BG667

F8X33-CNV3F-RH7MY-C73YT-XP73H

GPTCC-XN297-PVGY7-J8FQY-JK49V

HV3TW-MMNBG-X99YX-XV8TJ-2GV3H

J6FW2-HQNPJ-HBB6H-K9VTY-2PKT7

KQWNF-XPMXP-HDK3M-GBV69-Y7RDH

MMRNH-BMB4F-87JR9-D72RY-MY2KV

N4WY8-DVW92-GM8WF-CG872-HH3G7

ND8P2-BD2PB-DD8HM-2926R-CRYQH

RRYGR-8JNBY-V2RJ9-TJP4P-749T7

VHNT7-CPRFX-7FRVJ-T8GVM-8FDG7

84NRV-6CJR6-DBDXH-FYTBF-4X49V

BDDNV-BQ27P-9P9JJ-BQJ96-KTJXV

967N4-R7KXM-CJKJB-BHGCW-CPKT7

KQWNF-XPMXP-HDK3M-GBV69-Y7RDH

F2M4V-KFNB7-9VVTW-MVRBQ-BG667

CR8NP-K37C3-MPD6Q-MBDDY-8FDG7

39DQ2-N4FYQ-GCY6F-JX8QR-TVF9V

VHNT7-CPRFX-7FRVJ-T8GVM-8FDG7

GPTCC-XN297-PVGY7-J8FQY-JK49V

HV3TW-MMNBG-X99YX-XV8TJ-2GV3H

CDQND-9X68R-RRFYH-8G28W-82KT7

7HBX7-N6WK2-PF9HY-QVD2M-JK49V

D32KW-GNPBK-CV3TW-6TB2W-K2BQH

NBWPK-K86W9-27TX3-BQ7RB-KD4DH

2NF99-CQRYR-G6PQ9-WYGJ7-8HRDH

F7BDM-KTNRW-7CYQP-V98KC-W2KT7

4JKWV-MNJCY-8MW3Q-VJYGP-DC73H

KQWNF-XPMXP-HDK3M-GBV69-Y7RDH

MMRNH-BMB4F-87JR9-D72RY-MY2KV

N4WY8-DVW92-GM8WF-CG872-HH3G7

ND8P2-BD2PB-DD8HM-2926R-CRYQH

RRYGR-8JNBY-V2RJ9-TJP4P-749T7

FFX8D-N3WMV-GM6RF-9YRCJ-82KT7

2CMGK-NMW4P-B846H-YXR6P-27F9V

D2GBF-NGBW4-QQRGG-W38YB-BBFDH

NTVHT-YF2M4-J9FJG-BJD66-YG667

GBJJV-YNF4T-R6222-KDBXF-CRYQH

4NMMK-QJH7K-F38H2-FQJ24-2J8XV

84NRV-6CJR6-DBDXH-FYTBF-4X49V

3NHJ7-3WWQK-4RFTH-8FHJY-PRYQH

988NM-XKXT9-7YFWH-H2Q3Q-C34DH

TGXN4-BPPYC-TJYMH-3WXFK-4JMQH

N9C46-MKKKR-2TTT8-FJCJP-4RDG7

Q4NBQ-3DRJD-777XK-MJHDC-749T7

2VTNH-323J4-BWP98-TX9JR-FCWXV

D7KN2-CBVPG-BC7YC-9JDVJ-YPWXV

2GVN8-TV3C2-K3YM7-MMRVM-BBFDH

4NMMK-QJH7K-F38H2-FQJ24-2J8XV

76NDP-PD4JT-6Q4JV-HCDKT-P7F9V

7HBX7-N6WK2-PF9HY-QVD2M-JK49V

How to access blocked websites.

This summary is not available. Please click here to view the post.

Hack Windows 7 Login Password easily

Hello there readers! In this post we show the coolest and easiest way to hack Windows 7 login password using admin account within minutes.

Follow the steps and Enjoy! :

  • Press on the F8 key while you start Windows 7 until your PC displays the boot menu.
  • Select Safe Mode option and press the Enter key.
  • Then a login box appears, click on Administrator in the username box and leave the password field as blank, click on OK to login.
  • Now you can open Control Panel, then in User Accounts you can reset any user password easily. :)

Clone your Hard drive without any Software.


It's always better to have a copy of anything you have to assure that the data/stuffs are safe.
Did know that you could clone your current Hard Drive without having to by extra software? Maybe you didn't know that all that you needed, was already set up on your current system? Well, it is... and if you follow this tut, you shouldn't have much of a problem.

Make sure that you have a Master and a Slave setup on your system. The Slave drive, in this case, is where all the data on the Master is going to go to.

First Step: Perform a Scandisk your Master drive and follow that with a thorough Defrag. If you have an Antivirus program, do a thorough sweep with the AV first, then do the Scandisk, followed by the Defrag.

Second Step: Do the same thing to the target drive, as you did the Master: Scandisk then a thorough Defrag.

Third Step: Right-click on the Target drive and click on Format. When the box comes up, click your mouse onto the "Full" button.

Fourth Step: After Formatting the Target drive, run a Scandisk again and click on the button that says "Autofix Errors".

Fifth Step: In this final part, you might want to cut-and-paste to code in, unless you are sure that you can do it without making any mistakes:

Click on the "Start" button, then click on the "Run..." button, then place the following into the Runbox:

"XCOPY C:\*.*D:\ /c/h/e/k/r" (minus the quotes, of course) then press the "Enter" button.

If you receive an error message, then remove the space from between XCOPY and C:\

Anything that should happen to come up in the DOS box, just click "Y" for "Yes". When its all finished, pull the original Master from the system, designate the Slave as the Master (change your jumpers), then check your new Master out.

This tut has worked and has been tested on all systems, so you really shouldn't have any problems. If, by any chance, you should come across a snag, message us and We'll walk you through it. Enjoy mates;More from treotrickz coming up!

How To Use Windows Default Software To Take Screenshot


You might have gone through some situation where you needed to take the screenshot of what we have done.Consider an example.You are the representative of a company helping people to solve problems on computer working totally online.And just consider that you had a situation in which a sequence of actions is to be done.Your clent doesnot understand you by words and he asks for screenshot explanation.Then only you came to know that there is no software to take screenshot or video of the activities you have to do.So what to do?Your client is also waiting..But there is a solution “Problem Steps Recorder”.Which is a default function in windows 7(might be available in lower or upper versions)But the joke is that this facility is not really meant for taking screen shot but is meant for the purpose for remote assistance for troubleshooting purpose if you have any problem in your pc.It will automatically takes the snapshot of the activities.the main advantage is that the screenshots will be having the correct steps in wordsuch as “click left mouse button””click start” etc….so it can be send to any person who have only basic knowledge so that he can just read,see and understand the whole sequence.Also the file is saved as MHTML and as a ZIP file.So space is saved. Also a complete review of what is done will be also added at the end.(you need a browser to view this .mhtml file)
To use the “Problem Steps Recorder”
1)Go to “control panel”
2)Expand “all control panel items”
3)Click on “Troubleshooting” menu
4)Then “Get help from a friend” on the left side of the screen
5)At the bottom select “Problem Steps Recorder”
6)Then you can see a popup window having options for “start record”,”stop record” etc…..
7)When you stop record a popup window will open asking you to save that recorded piece of file
8)Save the file in any name anywhere
The recorded item will be saved as MHTML with a name starting with problem followed by a serial number inside a ZIP file.so totally the space is saved and you can have recording of as many actions as you want at a strectch.
You will also get brief description of every action you did above each image (including time,date etc)and a additional summary at last.