Welcome to techytweaks..

Welcome to techytweaks. Hope you enjoy.

TechZone on techytweaks.

Get updated with the Latest Tech-Tweeks with techytweaks.

Need any Support/Help?

Need help? Got a thing for us?

Follow us!

Follow us on Social Networking sites...

Now follow techytweaks via Mobile!

Enjoy the mobile version of techytweaks now! Stay updated!

ADVT

Showing posts with label HACKS. Show all posts

iOS 11.2-11.3.1 Jailbreak, troubleshooting, All you need to know!


It's been long since the developers manged to jailbreak iOS devices,which was touted as the safest and most stable mobile operating system ever. Lets take a moment to appretiateeffort of the whole team!
Finally the electra team has managed to achieve the jailbreak.
In this tutorial, we’ll show you how to jailbreak iOS 11.2-11.3.1 using Electra1131. When you’re ready to move forward with the jailbreak process, simply follow these steps:

1.Go to the electra website, download the electra ipsw file based on your type of account. (Developer/Non-Developer)

2.Now, download Cydia Impactor from here 

3.Connect your iPhone, iPad, or iPod touch to your computer.

4.Click and drag the Electra1131.ipa file over the Cydia Impactor window like so:


 5.Sign in with your Apple ID when prompted; You might have to generate app-specific password(from appleid settings) and enter it if you have enabled 2-factor authentication.

6.Once installed, go to Settings → General → Profiles & Device Management and tap on your Apple ID:
Next, tap on the blue Trust button, and then tap on the red Trust button inside the popup

Note: Before proceeding to the next step, CoolStar recommends enabling Airplane Mode, disabling your passcode/Touch ID/Face ID, disabling Siri,Deleting downloaded iOS updates and rebooting your device.
Also install tvOS profile to avoid any future iOS updates. 

 7.After taking the recommended steps above to prepare your device, tap on the Electra icon from your Home screen and then tap on the Jailbreak button in the app


 8.After respringing, you should find Cydia on your Home screen.

9.Go  to "Electra" application again, Click 'Enable Jailbreak'. Your device should respring now and its done!


 TROUBLESHOOTING:

Electra fails at Please wait (1/3)

This is the most common problem users are experiencing with Electra right now. There is no 100% working solution, however there are methods that a few users have used to increase their chances of success.
A few users on Discord reported that they could get the jailbreak to work by following these steps:
  1. Turn on Airplane mode.
  2. Reboot.
  3. Open phone go to widgets page, settings, scrolling up and down until animations are smooth.
  4. Lock phone for 10 seconds.
  5. Unlock, open Electra and hit Jailbreak.
Here's how I got it to work the first time:
  1. Airplane mode enabled, Siri disabled, and charging.
  2. Try Electra, and if it fails the device will reboot.
  3. Right when the device boots up, unlock, open Electra, and hit Jailbreak.
  4. There is a 30 second cooldown timer; just wait for that to run out.
  5. When it runs out the jailbreak will start.
Again, these are only the steps from the first time I got it to work. I can't guarantee they will work for anyone else.


iOS 9.3.3 Jailbreak-The complete solution.

Hello lads! As we all noticed The jailbreaking solution for iOS 9.3.x was released couple of days ago.
There are few things to take care of and also know If you are deciding to jailbreak their devices.
1.Only for 64 bit devices.(Starting from iPhone 5s)
2.It's a semi-tethered jailbreak,Meaning that you will have to hit 'jailbreak' button everytime you restart your device.(Will take only 5-8sec only.)
3.When jailbreak is done,You will be issued with a certificate for 7 days,Which will expire after 7 days obviously,So you will have to jailbreak again using PC.But,fortunately we have found out a method to make these certificates(profile) last for a year so that Peeps out there don't have to worry about jailbreaking their devices every week. :)

So,Lets get started.

Download-IPA File
Size:10.45 MB / Version:1.0 / MD5:fe77f02db26b9d3d142ee1f343a6fdbb / SHA1:ab334937cd7bb7077eac25b223bd3784e8dcd7b7
Preparation:
1. Pangu jailbreak IPA file NvwaStone_1.0.ipa available at http://pangu.io .
2. Cydia impactor available at http://www.cydiaimpactor.com/ .
(Special Note: This tool, developed by Saurik, is used to sign the ipa file so that Pangu jailbreak tool can be executed on iOS devices. Cydia impactors does not collect your apple id and password. All the information is only used for applying a personal free certificate from Apple.)
3. A computer (Cydia impactor runs on all major OSes, including Windows, OS X, and Linux)
4. A valid Apple ID. (In case that you do not want to use your current Apple ID to apply the personal certificate for any reason, we suggest you apply a new Apple ID and use it)
Limitations:
1. An Apple ID can only apply for a certificate for a limited number of devices.
2. The certificate will expire in 7 days. If your certificate gets expired, you need to follow the guide to install the jailbreak IPA again.
To Apple Developers:
If you have enrolled the Apple developer membership, signing the IPA file with your own developer certification is a better choice (i.e., Pangu jailbreak app will get expired in 1 year, rather than 7 days).
Jailbreak guide:
1. Unzip the Cydia impactor file and run it.
2. Connect your iOS device to your computer and trust the computer on your iOS device.
3. Drag NvwaStone_1.0.ipa into Cydia impactor app.

4. Click OK button to continue.

5. Input you email address( it’s your apple id)

6. Input your apple ID password.

7. Cydia impactor will automatically prepare everything based on your inputs and sign the IPA file. If everything is OK, the IPA file should be installed in your iOS device correctly. If you get error notifications, you probably input incorrect Apple ID or password.
8. On your device, Tap Settings > General > Device Management. You then see a profile for the developer under your “apple ID” heading. Tap the profile to establish trust for this developer. (An Internet connection is required to verify the app developer's certificate when establishing trust.)
9. On your device, find Pangu App and run it.
10. Click the "start" button to jailbreak your device.


ONCE YOU HAVE JAILBROKEN YOUR DEVICE,FOLLOW THE STEPS BELOW TO GET THE 1 YEAR PROFILE.(CERTIFICATE).

How to get the 1-year enterprise certificate

If you’re ready to arm your jailbroken iOS 9.3.3 device with an enterprise certificate that will last a full 365 days, then you’ll need to follow the steps below:
1) On your jailbroken iOS 9.3.3 device, Delete the current jailbreak app by entering ‘jiggle’ mode and tapping the X on the icon.
Delete the current jailbreak app iOS 9.3.3
2) After the app has been deleted, you want to reboot your device to enter ‘no jailbreak mode’:
iOS Slide to Power Off
3) Once you turn it back on, enable Airplane Mode from Control Center by tapping on the Airplane Mode toggle button:
Turn on Airplane Mode
4) Next, plug your jailbroken iOS 9.3.3 device into your Windows computer with a MFi-certified Lightning cable.
5) Download iFunbox on your computer, and also download this IPA file that was bundled with the original Chinese jailbreak tool.
6) Right click on the iFunbox installer and choose Run as Administrator.
iFunbox Run As Administrator
7) When prompted to allow the installer to run, click on the Yes button.
Allow iFunbox on your PC
8) Now choose English from the language list and click the OK button:
English then OK
9) When the installer opens, click on the Next button.
iFunbox Installer Next
10) Now, choose I accept the agreement and then click the Next button again.
Accept Agreement iFunbox Next
11) Click Next again when it designates the default installation path:
iFunbox Install Path Next
12) And once again, click Next after leaving the Start Menu folder alone:
Start Menu Folder iFunbox Next
13) Now click on the Install button that appears:
iFunbox Install
14) After all those next buttons, the iFunbox app will finally start installing on your computer. Just be patient:
iFunbox Installing Progress Bar
15) You will now be prompted to Run iFunbox (make sure to check the box if it’s not already), and then click on the Finish button.
Finish iFunbox Installation and Run the App
16) The iFunbox app will now open on your computer. Make sure to open the Manage App Data tab, and then click on the Install App (*.ipa) button.
iFunbox Install App IPA
17) Select the IPA file you downloaded earlier, and then click on the Save button.
Select IPA File and Save
18) iFunbox will now begin installing the jailbreak app on your device:
iFunbox Installing Pangu IPA
19) When you see this screen, it’s finished:
Pangu App All Done iFunbox
20) Now if you look on your iOS device’s Home screen, you should see the PP/Pangu jailbreak app:
PP Pangu Jailbreak App Home Screen
Note: All of our old jailbreak tweaks and apps are still on the device. They will continue to work after we finish this tutorial.
21) You can now disable Airplane Mode via Control Center.
22) Open the Settings app and navigate to General > Device Management.
Trust Beijing Enterprise Certificate iOS 9.3.3
23) Tap on the Beijing enterprise certificate, and then tap on the blue Trust button.
24) In the pop-up that appears, tap on the red Trust button. The enterprise certificate is now trusted on your device.
Note: Now that the enterprise certificate is installed and trusted on your device, all that’s left to do is boot your semi-untethered jailbreak into a jailbroken state.
25) Next, go to your Home screen and tap on the PP/Pangu jailbreak app to open it.
Launch PP app Home Screen
26) When prompted to enable Push notifications, tap on the blue OK button.
PP Pangu App Notifications
27) Tap on the circle in the app, and it will turn into text.
PP Pangu app tap on circle
28) Press the sleep button on your device to lock it. Shortly after, you should see a storage full notification, and a notification from the jailbreak app.
Cydia Installing Push Notification
29) Continue to wait, and your device should respring. When it does, you can launch Cydia from your Home screen again:
Cydia iOS 9.3.3 iPad mini 2 Pangu
Congratulations! You’ve just installed the 365-day enterprise certificate on your jailbroken iOS 9.3.3 device.
You are good to go now.Thanks for reading the post :)
Here are some great and handy jailbreak tweaks:
Activator,Battery life,Bio protect,Initialized,Instand touchID,Linktunes,Speed intensifier,Zeppelin.

Bypass WINRAR Password

Today,I encountered one of the most irritating moments on the internet.I had downloaded a 'zip' file and just then realised that it needs a password to be extracted-The ugly part,I had to do all the crappy surveys to get the password and It still didn't work.
So,One of the best solution available now was this. Here, The application uses brute force attack, Which tests different combination of alphabets,numericals and special characters to predict the password assigned to the file.
Probably you can’t bypass WinRAR password protected file password as you like when you just forgot or lost it. But you can bypass password and open files in archive next time.

How can we find WinRAR file password?

Password recovery tool is undoubtedly a good method. But does it can recover all of WinRAR file password? We know that WinRAR file is probably RAR or ZIP archive. If there is no such tool, how can we do?
Don’t worry. If there is really no such tool, take RAR Password Genius to find RAR file password, and use ZIP Password Genius to find ZIP file password. Because of the similarity between RAR and ZIP file password recovery, now we just need to see how to find RAR file password with RAR Password Genius.
1. Look for RAR Password Genius, then download and install it on computer.
When you download it, you can find there are two versions available, trial and full version. Trial version is free and full version needs to be paid. According to your RAR file password length, choose an appropriate version, because full version can find all kinds of RAR file password.
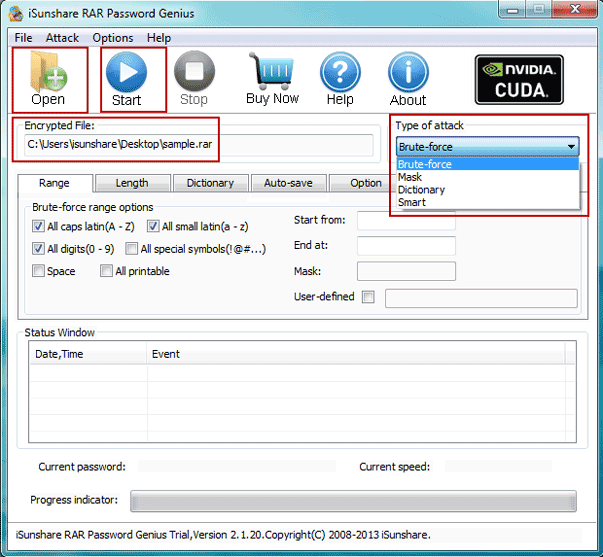
2. Import RAR file into RAR Password Genius after it is run.
With “Open” button on RAR password recovery tool, you can browse RAR file on your computer and import it into “Encrypted File” box.
find-winrar-file-password
3. Select password attack type after RAR file is imported.
From Type of attack drop-down list, you can see four powerful password attack types. Each one can recover different kinds of password with high efficiency. More about how to select password attack type and make settings, please see the articlePassword Recovery Type Settings.

4. Begin to find RAR file password with Start button.
bypass-winrar-file-password
Once you click “Start” button, RAR Password Genius will begin to find RAR file password for you. When you see password appears in pop-up window later, it’s time to remove RAR file password.

How to bypass WinRAR file password?

Open RAR file in WinRAR, and extract RAR file. When a dialog asks for a password, enter password you just found for RAR file and click OK. Then original RAR file password is removed and it is extracted. Now you can choose to compress files to RAR file again or not. No matter what you do, you have could bypass RAR file password to open or edit files compressed in RAR archive.
SOURCE : isunshare

Hack Windows 7 Login Password easily

Hello there readers! In this post we show the coolest and easiest way to hack Windows 7 login password using admin account within minutes.

Follow the steps and Enjoy! :

  • Press on the F8 key while you start Windows 7 until your PC displays the boot menu.
  • Select Safe Mode option and press the Enter key.
  • Then a login box appears, click on Administrator in the username box and leave the password field as blank, click on OK to login.
  • Now you can open Control Panel, then in User Accounts you can reset any user password easily. :)

How To Use Windows Default Software To Take Screenshot


You might have gone through some situation where you needed to take the screenshot of what we have done.Consider an example.You are the representative of a company helping people to solve problems on computer working totally online.And just consider that you had a situation in which a sequence of actions is to be done.Your clent doesnot understand you by words and he asks for screenshot explanation.Then only you came to know that there is no software to take screenshot or video of the activities you have to do.So what to do?Your client is also waiting..But there is a solution “Problem Steps Recorder”.Which is a default function in windows 7(might be available in lower or upper versions)But the joke is that this facility is not really meant for taking screen shot but is meant for the purpose for remote assistance for troubleshooting purpose if you have any problem in your pc.It will automatically takes the snapshot of the activities.the main advantage is that the screenshots will be having the correct steps in wordsuch as “click left mouse button””click start” etc….so it can be send to any person who have only basic knowledge so that he can just read,see and understand the whole sequence.Also the file is saved as MHTML and as a ZIP file.So space is saved. Also a complete review of what is done will be also added at the end.(you need a browser to view this .mhtml file)
To use the “Problem Steps Recorder”
1)Go to “control panel”
2)Expand “all control panel items”
3)Click on “Troubleshooting” menu
4)Then “Get help from a friend” on the left side of the screen
5)At the bottom select “Problem Steps Recorder”
6)Then you can see a popup window having options for “start record”,”stop record” etc…..
7)When you stop record a popup window will open asking you to save that recorded piece of file
8)Save the file in any name anywhere
The recorded item will be saved as MHTML with a name starting with problem followed by a serial number inside a ZIP file.so totally the space is saved and you can have recording of as many actions as you want at a strectch.
You will also get brief description of every action you did above each image (including time,date etc)and a additional summary at last.

Make An Autorun File For USB Files


When you plug a  USB drive in, you might be interested in making a program, or other things happen as soon as you plug in. The way you accomplish this is through the Autorun.inf file. The autorun.inf file is located in the root of the usb drive and tells Windows what to do automatically.
This autorun can be used to make good, or bad USB’s depending on what you like.


This tutorial covers:


Creating a USB Autorun.inf
Changing label\icon of thumbdrive
Making a new option appear in the autorun menu
Making programs automatically run when plugged in

So Read On...


Creating a USB Autorun.inf :


To create an autorun file, open Notepad and save ‘autorun.inf’’ (with quotes) and save it to the root of the drive. All it needs to have is in the first line;


[autorun]

Done!

Changing label\icon of thumbdrive:

Follow the steps in Creating a USB Autorun.inf. Before you save it, type this in in this order!

[autorun]

icon=myicon.ico


label=MyLabel


And save. Make sure the icon file is in the root of your drive.

Making a new option appear in the autorun menu:

Right, so make your autorun file and type this into Notepad:


[autorun]
icon=default
label=[yourlabelhere]

action=programname.exe
Open Program


Save it and exit. Once again, the program has to be in the root. Now, when you plug it in, the option should appear in the menu.

Making programs automatically run when the USB is plugged in:

Follow the same instructions, blah blah blah;


[autorun]
Icon=default
label=YourLabelHere
open=programname.exe


And that’s it for this tutorial!
 
You can also follow these instructions when making a CD. You just have to burn it on the cd.

Read out or Delete the BIOS password successfully .

Your security awareness has become a curse for you.You now want to reconfigure your BIOS but have forgotten the password to it? Well,Here is the solution!
The easiest way to reset BIOS password is just to use the Clear RTC Jumper.This jumper is present on almost all classic motherboards in desktop PCs.Search for 'BIOS Resed',"Clear 
RTC' or 'CMOS Reset'in the manual of your motherboard.(if you don't have the manual,you can download it from the manufacturers website if required).The instructions are often 'Jumpers' chapter.


If your motherboard does not have a suitable jumper,then you can try resetting the BIOS RAM values to default by removing CMOS battery.Always disconnect the computer from the main plug.Remove the lithium button cell and place a coin of similar size in the battery holder(short out the pins).This ensures that any residual voltage holding the content of BIOS memory is done away with.Now wait for at least 10 minutes (15min. If you are in a cooler area) before removing the coin and re-positioning the battery.During the booting process,enter the BIOS and load the default settings.You can re-configure BIOS after restart.This does not usually work for netbooks,laptops and notebooks.In this case,you should seeek help from the manufacturer's help desk or service center.

Best Keylogger Software:Max Keylogger


For the past few weeks I have been busy testing keylogger softwares.There are a lot of keyloggers available on internet and selecting a best is indeed a difficult task.If you are also looking for a keylogger that tracks each key stroke,send reports to emails,take screenshots ,Is Undectable and Copy text from Clipboard then Max Keylogger is best for you.

Are Keyloggers Legal To Use?

Keyloggers are usually associated with hacking but this is not the case.It is completely legal to use keyloggers to monitor activity of employees,Children and other people using your computers.
max keylogger review 1 Best Keylogger Software:Max Keylogger

Different People can have Different Purposes For using a Keylogger

To System administrators:
Keylogger could help you clearly know about what have been displayed in the system. protect yourself know everything they do on your computer.

To CEOs:
The computers in your company are under your full control with Max Keylogger. You will be clear about all your employees’ performances or actions anyone using your official computer. Max Keylogger protect your business.

To Parents:
You could follow up all programs your children have run. And find out what they have search on the Internet. Protect your children form online dangers.

To All Users:
Be able to build a full control on your own PC with Max Keylogger. Besides you will be clear about what was run and when, what text was typed, etc. on your PC in your absence. Using the program constantly, you will able to restore the previously typed text in case you have lost it. With the help of Max Keylogger, you also could restore the forgotten password or the lost email.

To Computer Classes and Internet Cafes:
Max Keylogger will let you know what the users have been doing on the computers.

Key features Of Max Keylogger

Stealth:-Max keylogger is completely Undectable from Task manager,Taskbar as well as Add/Remove Menu in control panel.
It can only be opened using a special key combination and cannot be uninstalled without password.
Remote Reporting:-It is one of the best and most useful feature of Max Keylogger.You can specify and Email id and interval time after which reports will be automatically sent on your email id which includes system screenshots.
I have tested it with Gmail ID and it works perfectly fine.
Organization:-You will notice a clean interface with easy to navigate icons.It has all the options along with notifications on home screen.See the screenshot below
max keylogger review organisation1.png1  Best Keylogger Software:Max Keylogger
Screenshots monitoring:You can specify the time interval as well as quality of images(black and white,coloured etc) for screenshots.It can take screenshots of complete screen or only active screen
Clipboard recording:-People usually copy/paste their passswords to make them undectable from keylogger but Max Keylogger has the ability to caputer the clipboard passwords.
max keylogger review screenshot.png Best Keylogger Software:Max Keylogger
Voice recording (unique feature):-This one of the Unique features of Max Keylogger.It can Record Voice and Video Calls(without video).
Click here to Download!